Posted on Leave a comment

Translating Pen Turning Terms into Polymer Clay

Much of the information online about pen turning is confusing because it’s difficult to sort out what actually applies to making polymer clay pens and what doesn’t.

Do I need a lathe?

No. I have posts here about how to use a drill to finish pens, and you can even just sand them by hand if you want. They are linked off my page on Making Pens with Polymer Clay.

Do I need to buy blanks?

No, you will form your clay right on the brass tubes that come with a pen kit. All you need to do is buy a kit (search “pen kits” in your favorite search engine to find many sources for buying them.)

If you just want to practice, or want to make “blanks” (barrels) to sell, you can buy tubes separately.

Do I need to drill out the center? Superglue the tube to the clay?

No, that’s because woodturners get solid blocks of wood or acrylic that they need to drill out and then superglue (aka CA glue) the tube in. Since we form our “blanks” right on brass barrels, there’s no need to drill them out.

Do I need to buy wood turning tools like a chisel?

No, not unless you are planning on building a solid clay blank and turning it like it were wood. Most polymer clay pens are formed close to their final shape and size, and you can use your standard sanding tools to sand them down and smooth them.

Do I need a mandrel? Bushings?

No, you can make your own mandrel and while bushings are helpful, they’re not required. See my article on the minimum equipment necessary to make a pen for information on how to create your own tools from cheap hardware store components.

Do I need specialized sanding or polishing equipment?

No, you can use what you already use for polymer clay. Just realize that, like jewelry, polymer clay pens will be handled up close so you need to sand and polish them very well and, unlike jewelry, it’s very hard to use resin on them.

You may want to read my article on optional tools that make penmaking easier and higher quality, which discusses some specific sanding and polishing options.

Do I need a pen kit?

Eventually you may like one, but you can start using disposable Bics (or potentially even other brands, just check that the barrel (without the ink cartridge) can stand up to your oven at your clay’s temperature for your normal baking time. Bic Clic Stic, Bic Soft Feel Retractable, and Bic Round Stic are all pens I have heard will work, though it’s always worth double-checking yourself in case the manufacturer changed the formula.

You will need to pull the pens apart, cover the barrel (remove the ink cartridge!), bake, sand/finish, and then put the pen back together.

Do I need a pen press?

Technically no, though if you bought one piece of specialized equipment, I’d recommend it be a simple pen press. There’s more information in my article on the minimum equipment necessary to make a pen.

Do I need to use some specialized finish like CA glue (superglue)?

Definitely not! Melanie Rollens is a fabulous cane and pen maker and doesn’t finish with anything other than sanding and buffing.

That said, I personally prefer a CA finish, and have written a bunch of articles linked off my page on Making Pens with Polymer Clay to try to de-mystify the process for polymer clay artists.

Posted on Leave a comment

Quality of life equipment upgrades for pen making

Got the basics purchased but interested in some ways to make penmaking easier by spending a bit of money? Here are some of my favorite tools.

I do not get any commission from any links on my site, not even from Amazon. I am just sharing things I’ve found effective and helpful.

Kits and Tubes App

The International Association of Pen Turners has a database of bushings and tube sizes, but they also provide it in app form for iOS for $0.99: IAP Bushings & Tubes Reference. There’s also an Android version I haven’t personally used.

It’s definitely not required, but I’ve found it a useful reference and for $0.99 it’s a nice way to thank them for keeping the database up to date as well.

They will be updating the database again soon, according to their website, so while you may find some missing kits (I haven’t yet, but I’m using pretty standard kits) an update is supposedly coming.

Cutters

I used these PolyClay Tube Cutters from Penn State on every pen I make and find them well worth the $7 I paid for the set.

There are different sizes that will allow you to quickly and easily cut clay to fit (with no overlap) around the most popular pen barrel sizes: 7mm, 8mm, 3/8 in., 27/64 in. and 10mm.

They’re extra long, so they work with a variety of tube lengths, and you can easily trim the ends off your barrel after wrapping it.

When I’m doing a kaleidoscope I don’t use them, since I want it to tile perfectly (then I use my graph paper templates), but since I often like to work on a base layer of clay, they’re perfect for getting an easy base layer in place rolled out on the very thinnest level on my pasta machine.

PolyClay Mandrel

Also from Penn State, this PolyClay-specific mandrel makes it very easy for me to sand, finish, and polish my barrels on my drill. You can make one yourself (I give suggestions in my article on the minimum equipment necessary for penmaking), but I didn’t know that at the time.

I haven’t regretted the purchase though: the slightly flattened end nuts, long threaded rod, and knurled connecting nuts make it a breeze to use on my drill and I reach for it every time rather than my home made setups.

At $15 it’s not the cheapest thing out there, but for me it’s been worthwhile.

Round Cane Slicing Jig

I do not use this personally, because I don’t make pens like this, but many do, so I’m mentioning it as an option. If you’ve used it, I’d love to hear from you in the comments on this post!

Penn State also produces a PolyClay Cane Slicing Jig to make it easier to hand-slice round canes without distortion. If you already have one of the fancier slicers you may not be interested, or if you don’t do round canes often (like me), but at $10 it might be a useful purchase for the right person.

Thomas Scientific Blades

Switching to these Thomas Scientific Tissue Blades made a big difference for me in cutting my canes. They are thin but not overly flexible, and my slices have gotten much more even and thin.

LindasArtSpot sells them in 5, 10, and 25 packs. You may also be able to find them other places, but this is the source I know and where I got mine. They aren’t cheap — these are not the generic “tissue blades” you will find searching, they’re a specific brand I’ve found is significantly better than others I’ve tried — but I now use nothing else to slice my canes for my pens.

Wool buffing wheel

If you aren’t using a plastic polish and/or CA glue, this is a significantly better buffing wheel than any other one I have used: Buffing Shank with Wool Polishing Head 1”

It doesn’t leave nearly as many micro scratches behind, and as long as you buff thoroughly, it’s the best surface I’ve been able to get on clay using a buffing wheel.

Novus Polish

Novus Plastic Clean and Shine works great if you’re working on a drill or lathe, and has less of a chance of damaging your CA finish with the heat from a buffing wheel. The abrasive is suspended in a liquid, which helps heat disappation.

They also offer “Novus Polish Mate”, but having tried it, even though it’s cheap, I agree with the reviewers on amazon: it’s basically paper towels. I wouldn’t recommend it unless you are having issues with paper towels.

CA Glue

I was very hesitant to start using CA glue but I’m so glad I did. I love the finish and the confidence to hand my pens over to people to use long term. One experienced polymer clay maker reported that she’s had a CA-coated pen in her backpack for almost a decade and the clay+CA surface is just as good as it was on the day she made it — the pen hardware has gotten more beaten up than the clay surface.

I wrote a lot of articles on how to use CA, since it’s an unfamiliar topic to experienced clay artists. They’re all listed on my index page for my articles on Making Polymer Clay Covered Pens.

Abranet

I confess: I am not a perfect slicer. And I slice too thick. Even with the blades above. Given that I make a lot of slimlines, this means I end up sanding…a lot.

I’ve come to love my Abranet mesh paper for sanding my pens. It’s much more durable than any other sandpaper I’ve used, and holds up well to even long sanding sessions as I get a barrel down to size.

(Note that you will find much cheaper mesh sandpapers available, but read the reviews carefully. Part of why Abranet is so popular is it sands well and lasts a long time, and other mesh sandpapers often don’t have the same qualities.)

Micro Mesh Sanding Pads

I used to use polishing papers, but about a year ago I switched to micromesh sanding pads and am very happy I did. (There’s also what appear to be very similar sanding sheets, though I haven’t used them.)

The set I bought didn’t include this dispenser, and you can probably find some that doesn’t, but I suspect the dispenser is actually really useful — one of the problems I always have is fumbling for the right color and keeping them straight, and I really like the construction of the one here.

Note that when you look at any micromesh pads you will see confused people writing negative reviews about how the pads are labeled wrong — they aren’t, they’re using a different labeling system.

Just remember that the sanding pads use a different grit system. The 1500 grit sanding pad is equivalent to a 400-600 grit sandpaper. Therefore, there’s no point in using your Abranet or sanding paper up to 800 or 1200 and then switching back to the lowest grit micromesh — you’re just undoing a bunch of work.

Pen Press

If you are using a vice today (or a rubber hammer), you may want to consider investing in a pen press. The best answer is a real pen press — and there’s one for sale on Amazon right now that is $38, which is very competitive with vice prices (and there’s one at Penn State for $50.) You may be able to find one cheaper somewhere else as well.

An alternative is the Assembly/Disassembly Pen Press from Penn State, which is the the one I have and can personally vouch for it working very well. I like having the option to dissemble a pen I’ve messed up, even if I don’t use it often.

Posted on Leave a comment

Minimum Equipment to Make a Pen

Unlike woodworkers, we’re unlikely to have any of the basics necessary to make a pen other than the clay, so here’s several levels of “what’s the minimum list of stuff I need to make a pen?” lists for buying the pen hardware, assembling the pen, making the barrel, baking the barrel, and finishing the barrels.

I do not get any commission from any links on my site, not even from Amazon. I am just sharing things I’ve found effective and helpful.

I assume you have basic polymer clay supplies: clay, blades, rollers or pasta machines, etc. If not, here are two great guides to beginner basic supplies for the clay portion:

If you’re interested in some optional equipment that makes it easier to make quality pen, take a look at my article on quality of life equipment upgrades for pen making.

Options for the pen hardware

Cover a disposable pen

The most basic thing to do is cover a bic pen. They’re fun, easy, cheap, and a good way to decide if you like working at such a small scale. All you need is a pen that won’t melt in the oven. You can try any pen that’s cheap and easy for you to get. Bic Clic Stic, Bic Soft Feel Retractable, and Bic Round Stic are all pens I have heard will work, though it’s always worth double-checking yourself in case the manufacturer changed the formula. (And at least in the US, you can often get these locally at an office supply shop as they are a common brand.)

Be sure to remove the ink from the barrel before baking.

The way most people make them (applying clay around the existing barrel) means the pen cap will no longer fit on if you are using the Bic Round Stic.

You can manufacture a new barrel yourself out of copper sheets, but it will have many of the same challenges of being a small diameter that the slimline pen kit has.

You can also make a cap, though I was never successful in making one with enough tolerance to actually stay on, so they were more “sitting on my desk” pens than anything else.

Most of the tutorials you’ll find online for polymer clay pens are for covering this type of pen.

Use a no-press pen kit

If you like the idea of a more traditional looking pen but don’t want to mess around with pressing a pen together, you can use a no press pen kit. I found them to be not as sturdy as the regular pen kits, but that may have been my error or the specific kit I bought.

Disassemble and Reassemble a Bic Soft Feel retractable

I haven’t tried these personally, but Michelle Dorn Hoffner suggested them as an in between alternative, since you do need to use a press or vice to re-assemble, but they’re much cheaper if you mess them up than a metal pen kit.

They have the advantage over the basic bics listed above of being retractable, so you don’t need to worry about a pen cap. Here’s a link, but they’re purchaseable many places: BIC 8373971 Soft Feel Retractable Ballpoint Pen, Medium Point, Black, 12-Count

Use a regular pen kit

You can find these on amazon or from any one of many pen kit suppliers — just search Google for pen kits.

Be aware that while Slimline pens often appear like a good beginner pen, the bushings (i.e. the height of the pen hardware itself, that you want your clay to be exactly as tall as) aren’t much taller than the brass barrel itself, making them hard to use because your clay (e.g. your cane slices) needs to be much thinner.

Specifically, a slimline pen has room for about four playing cards of clay before you’re exceeding the bushings. (Not familiar with the playing card method of measuring clay height? Read about it here. 10 cards should equal approximately 2.5-3mm.)

For my Atlas, for example, where 0 is my thickest setting and 9 is the thinnest, four playing cards translates to 5 thickness being a tad too high over the bushings and 6 being a tad low. I usually pick a 5 and sand back down. You can do a similar measurement with your own pasta machine to figure out what thicknesses are appropriate for your machine (all are different, even if they’re the same brand and same model, since they are not precision machines.)

That said, if you don’t care about having your first few pen barrels flush with the hardware (I didn’t!), then slimlines are great because they are cheap and plentiful and a good way to see if this is something you enjoy doing.

Options for assembling the pen

For this you will need some way to press the parts together. At a bare minimum you need a rubber hammer to use that to gently tap the parts together — but I wouldn’t recommend it, and if you don’t already own one I definitely wouldn’t recommend buying one.

You can also use a bench vice — it will need to be one that can go as wide as your widest piece you need to press, which could be several inches. While woodworkers often already have a vice in their shop, polymer clay artists are less likely to. And once you start looking at 4-5” vices, they don’t seem to be much cheaper than $30-$40 (though you may be able to get one used somewhere.) They also have the disadvantage that it’s harder to keep the pen fully in alignment — and if you don’t, you could bend the hardware and ruin the kit or even your barrel.

The best answer is a real pen press — and there’s one for sale on Amazon right now that is $38, which is very competitive with vice prices (and there’s one at Penn State for $50.) You may be able to find one cheaper somewhere else as well.

An alternative is the Assembly/Disassembly Pen Press from Penn State, which is the the one I have and can personally vouch for it working very well.

Options for making the barrel

Do nothing special

This will result in a pen that’s probably not flush with the hardware — but that may not matter to you.

It’s how I did my first few pens and plenty of people happily make their pens that way.

Use a home-made mandrel

Any 1/4-20 threaded rod (or M6 in metric) will work, but so will a knitting needle if you have a ~6-7mm needle (sizes 2-4 UK, or 10-10.5 US). If your needle is on the smaller end of that range, you will want to use masking tape to thicken it a bit, or use rubber bands or a similar solution to hold the tube in place.

You can also buy 7mm smooth rods, which work great and are a bit easier to slide the unbaked barrels back and forth on.

I prefer having something that is 1/4” or 7mm (M6) exactly and then put my bushings on also: this makes it much easier to get my pen barrel to the right height even if I’m not using a drill to sand it down and will be doing it by hand.

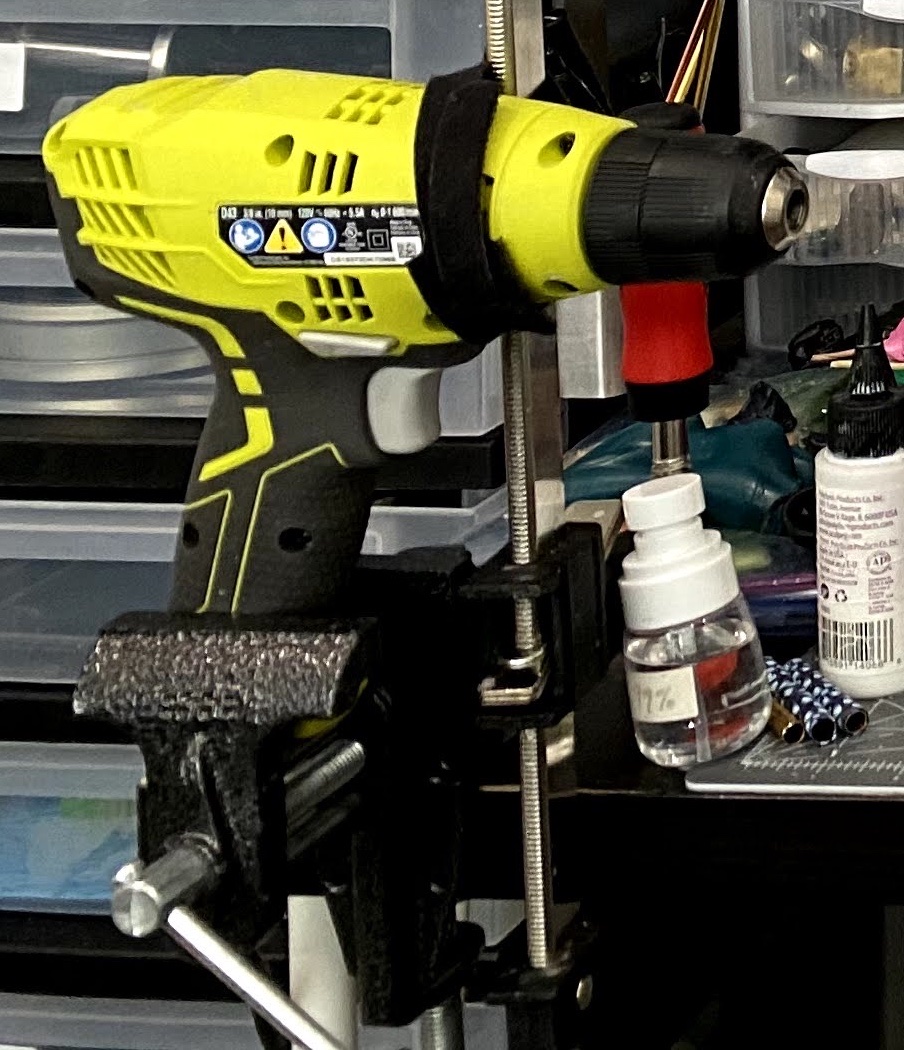
Buy a mandrel (or use a threaded rod) and attach it to your drill/lathe

Penn State sells a nice PolyClay Mandrel that works great either by hand, or if you’re attaching it to your drill or lathe.

Alternatively, you can use a threaded rod, but I found a 6” one (the largest my local hardware store had) to be too short to comfortably do two pen barrels so I’m happy with my mandrel purchase and I use my threaded rods for baking instead. But a longer one would work just fine (or do only one barrel on your drill at once.)

Options for baking the barrel

If you have the mandrel from Penn State, it’s designed with flat bottoms on the two large nuts on the ends so it won’t roll, and you can bake your barrels right on that.

You can use any bead rack you have or have made.

Or, I made little ‘feet’ out of polymer clay for my smooth rods as you can see in the image to the left here. The bottom is four layers of the thickest setting on my pasta machine, and the top is a single layer to hold the rod in place.

I made eight of them so I can use them to hold or bake multiple sets at once.

I like using spare slimline bushings to protect the end of the barrels so they don’t bump up into sharp edges on the feet before baking.

Options for finishing the barrel

I have several articles on hardware options for finishing the barrels, so I won’t repeat that here:

If you are finishing by hand, any sandpaper, polishing papers, and buffing method you’re used to using is sufficient.

If you are finishing with a drill or lathe, you can use your existing sandpaper and polishing papers, or you can look into abranet or sanding tape (I use both and find them very effective with the drill doing the work.)

You can also consider using CA glue (see my Making Pens page to see all my posts on using CA glue), but it’s a bigger investment than just normal sanding and buffing.

If you have a drill or lathe, consider Novus 1 Plastic Clean and Shine for your final buffing/polishing step. If not, any buffing wheels are a good choice, though these wool buffing wheels are the absolute best I’ve ever used and I don’t use anything else at this point.

Lost your pen kit directions?

The IAP (International Association of Penturners) has a very nice database of bushings and barrels and instructions that you can view online or email and print.

They also have a cheap app version of it for iOS and Android.

More?

If you’re interested in some optional equipment that makes it easier to make quality pen, take a look at my article on quality of life equipment upgrades for pen making.

Posted on 1 Comment

Finishing Pens: Drill with Lock-on

I was very interested in finding a solution that let me use both hands at once, so searched for drills and found this Ryobi (model D43K) with this specific feature: “The variable speed trigger helps you match the speed to the application, while the lock-on feature enables continuous drilling and helps to reduce operator fatigue during long drilling times.”

Advantages:

  • Corded, so won’t run out of battery mid-pen
  • ”lock-on” feature reduces finger fatigue during longer sessions

Disadvantages:

  • Doesn’t stand up on its own

To solve the last hurdle, I rigged together a setup with two vices and some Velcro cable ties and it works surprisingly well. It’s not perfect: there’s a bit of give, and you can’t orient the handle 90 degrees the other way, the vice won’t hold it steady. But I haven’t had any issues yet and I’ve been using it for a few weeks now.

When I’m not doing a pen, I just remove the mandrel and I get almost my whole work space back — if you have a larger table, it would be even less of an issue.

Here’s a photo of the drill in its vices:

Next up I’d like to look into flex shafts, because I suspect that would be the perfect final solution for me: attach a flex shaft, put that in the vice, use the always-on button on the drill and finish my pens easily and safely. When I’ve done that, I will make another post here.

Posted on 1 Comment

Finishing Pens: Cordless Drills

Finishing pens by hand is doable, but it’s harder to get a perfectly symmetrical finish and takes longer. Luckily, since we don’t need a lathe, there are some good and cheaper power tool options available.

Dremels are a popular tool, but unfortunately will not work as well for pens: pens work with a 7mm (1/4”) mandrel (or sometimes larger), and Dremels do not go above a 1/8” shank unless you have a much older one, as the motor isn’t strong enough to drive it effectively.

If you already own a Foredom tool, they can substitute very well for a lathe, and can run hands-free like the Dremel does, but if you don’t they are also expensive for a single tool purchase.

If you aren’t planning on using woodworking tools to literally turn your clay pens, the good news is there is a much cheaper option, though it requires a bit more fiddling: a standard drill.

The first, and simplest solution I used was a cordless drill like the one pictured here. I did have a corded drill, but as it didn’t have a flat bottom, I had to hold it up the whole time which was tiring very quickly when trying to sand.

Advantages:

  • Stands up on its own; my arms didn’t get tired trying to hold a drill in place while I sanded/finished a pen
  • No cord to worry about

Disadvantages:

  • My battery only lasted for 1-3 pens (depending on how much sanding I did)
  • No “hands free” operation: one hand had to be holding it in place and holding the trigger down.

Here are some photos of my cordless drill set up to finish two slimline barrels:

I’m using the polymer clay mandrel from Penn State Industries, but you could use any threaded 7mm or 1/4” rod with some low-profile nuts or extra bushings/spacers to keep regular nuts further away from where you will be sanding.

Next: how I solved the problem of not being able to do my pen finishing hands-free. Read that post here.