Posted on 1 Comment

Finishing Pens: Drill with Lock-on

I was very interested in finding a solution that let me use both hands at once, so searched for drills and found this Ryobi (model D43K) with this specific feature: “The variable speed trigger helps you match the speed to the application, while the lock-on feature enables continuous drilling and helps to reduce operator fatigue during long drilling times.”

Advantages:

  • Corded, so won’t run out of battery mid-pen
  • ”lock-on” feature reduces finger fatigue during longer sessions

Disadvantages:

  • Doesn’t stand up on its own

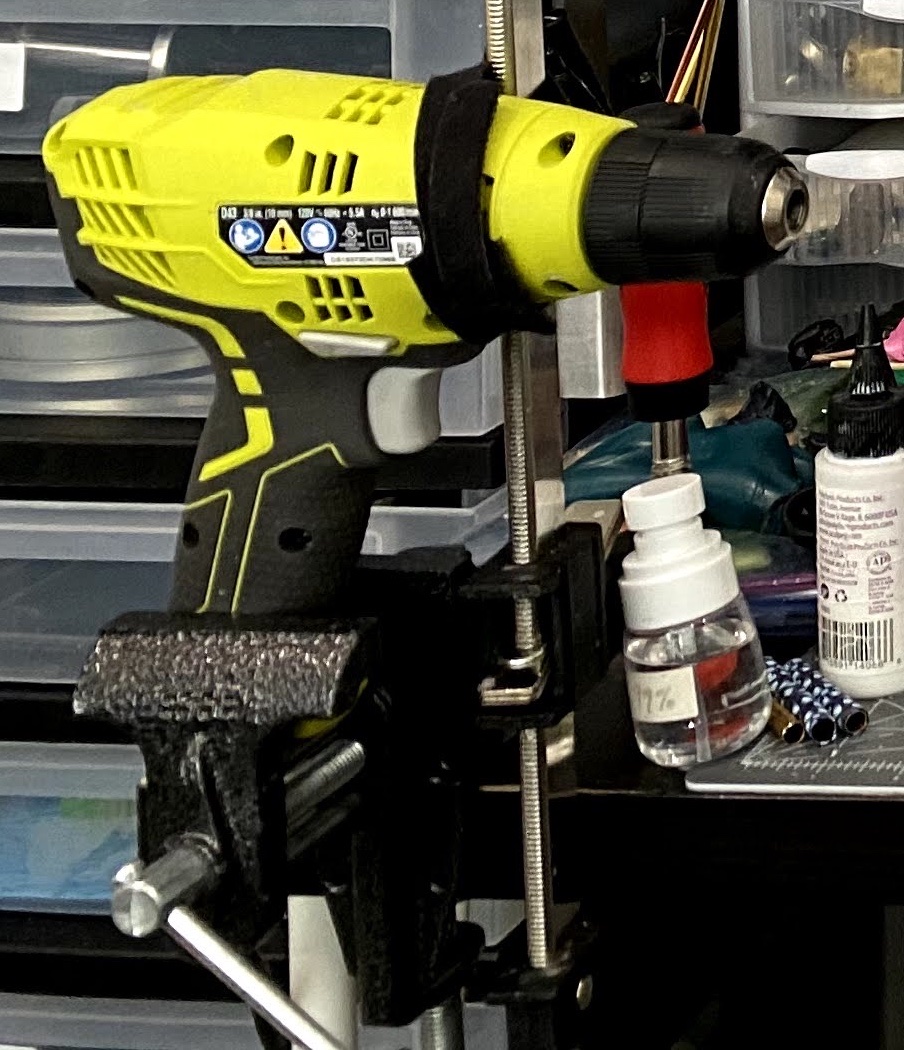
To solve the last hurdle, I rigged together a setup with two vices and some Velcro cable ties and it works surprisingly well. It’s not perfect: there’s a bit of give, and you can’t orient the handle 90 degrees the other way, the vice won’t hold it steady. But I haven’t had any issues yet and I’ve been using it for a few weeks now.

When I’m not doing a pen, I just remove the mandrel and I get almost my whole work space back — if you have a larger table, it would be even less of an issue.

Here’s a photo of the drill in its vices:

Next up I’d like to look into flex shafts, because I suspect that would be the perfect final solution for me: attach a flex shaft, put that in the vice, use the always-on button on the drill and finish my pens easily and safely. When I’ve done that, I will make another post here.

Posted on 1 Comment

Finishing Pens: Cordless Drills

Finishing pens by hand is doable, but it’s harder to get a perfectly symmetrical finish and takes longer. Luckily, since we don’t need a lathe, there are some good and cheaper power tool options available.

Dremels are a popular tool, but unfortunately will not work as well for pens: pens work with a 7mm (1/4”) mandrel (or sometimes larger), and Dremels do not go above a 1/8” shank unless you have a much older one, as the motor isn’t strong enough to drive it effectively.

If you already own a Foredom tool, they can substitute very well for a lathe, and can run hands-free like the Dremel does, but if you don’t they are also expensive for a single tool purchase.

If you aren’t planning on using woodworking tools to literally turn your clay pens, the good news is there is a much cheaper option, though it requires a bit more fiddling: a standard drill.

The first, and simplest solution I used was a cordless drill like the one pictured here. I did have a corded drill, but as it didn’t have a flat bottom, I had to hold it up the whole time which was tiring very quickly when trying to sand.

Advantages:

  • Stands up on its own; my arms didn’t get tired trying to hold a drill in place while I sanded/finished a pen
  • No cord to worry about

Disadvantages:

  • My battery only lasted for 1-3 pens (depending on how much sanding I did)
  • No “hands free” operation: one hand had to be holding it in place and holding the trigger down.

Here are some photos of my cordless drill set up to finish two slimline barrels:

I’m using the polymer clay mandrel from Penn State Industries, but you could use any threaded 7mm or 1/4” rod with some low-profile nuts or extra bushings/spacers to keep regular nuts further away from where you will be sanding.

Next: how I solved the problem of not being able to do my pen finishing hands-free. Read that post here.

Posted on Leave a comment

Finishing Pens: By Hand

Woodturners use lathes to finish their pen blanks, because they need to carve the wood or acrylic down to size. If you have access to a lathe, that’s obviously a fine solution, but unlike pen turners who work in wood, many polymer clay artists do not have access to a lathe.

The good news is, unless you are actually trying to turn a pen using woodworking tools to carve into it after baking or to reduce its size faster than sanding alone would do, you don’t need a lathe.

In later posts I’ll cover how I use drills to finish pens, but you can sand a pen by hand without using any power equipment at all.

Before sanding

If you are finishing by hand, you will want to make sure it’s as smooth as possible. The best way to do this is to roll it gently on the table with a clear acrylic block or tile or other smooth surface.

Alternatively, you can use the heel of your hand, not your palm or fingers. If you use your palm or fingers you will put uneven pressure on it.

Be sure to roll gently and slowly. If you have creases in your clay from where cane slices joined, you can gently roll a knitting needle tip across them to speed up the process. But if you roll on the table too quickly or pressing too hard, you will distort your canes near the edges and may even push the clay off the pen barrel.

Sanding

Start with the highest grit you can. If you were able to get the clay very smooth, that might be 240, 320, or 400. If it’s bumpy, you may need to start lower.

Cup the sandpaper in your hand and sand evenly around the whole pen barrel. Be sure to sand in both directions — back and forth as well as around — to avoid leaving scratches in one direction.

Sand as high as you can, finishing with micromesh or finishing papers if you have them, and then buff.

A note about height and bushings

Pen turners use “bushings” (small metal tubes of a particular diameter) to get their pen bodies flush with the rest of the pen hardware. If you are sanding by hand and care about a smooth transition across the length of the pen, it’s extra important to try to get the height of your pen body as close as possible before baking, so you minimize the amount of sanding you need to do.

Here’s an example of two pens I did. The first is one carefully sanded down to bushing height before being assembled. The second is one of my early ones, before I knew to pay attention to bushing height.

Posted on Leave a comment

Simple Bowl Shape

I prefer making useful objects or artwork to jewelry, which means I make a lot of bowls and boxes. I found a way to make a very simple bowl shape that makes a flat square veneer look much more sophisticated than you would expect.

Lay out the cane tiles to make a square of whatever size you want, and fully flatten and burnish the veneer until you are satisfied.

Carefully drape it over a round form (e.g. a cake pan like these) and slowly smooth it down with your fingers, shaping the clay to the new shape.

I find that spraying some water on the bowl helps as you’re re-shaping the clay.

Bake as normal, and if you want a flat-ish bottom you can remove it from the form as soon as it’s done baking and set it upright on a table. It will flatten slightly on the bottom and make it less tippy when cooled.

Sand and finish as normal.