Posted on Leave a comment

CA Glue Safety: Protecting Surfaces

The strength of CA glue is that it will bond to anything — which is also its challenge. But there is a short list of things it doesn’t stick to — and most of them aren’t easy to find for surface protection.

In general, particularly when you are using an activator, CA will be happy to find things to stick to.

Polyethylene

While this isn’t listed in the most popular article for “what does CA glue not stick to”, if you search on how to glue polyethylene, it’s often being discussed at the same time as polypropylene as something that is hard to glue.

My recommendation for performance, price, and availability would be to look for polyethylene gloves, either disposable or not depending on what you prefer.

I ended up getting these polyethylene gloves because they are thin, cheap, disposable, and it’s not an issue if some CA ends up adhering to them: Disposable Clear Plastic Gloves.

Alternatively, you can use something like painter’s tape (aka masking tape) to tape over your fingers to protect them (especially if you are using paper towels.)

If you are using paper towels, consider slightly thicker gloves (e.g. I have a set of polyethylene gardening gloves) if you are using my preferred method of applying the CA glue, because I found the heat uncomfortable on my finger otherwise.

To protect my jeans and other surfaces, I use a polyethylene sheet cut into appropriate-sized pieces. Here’s an example: HDX 10 ft. x 25 ft. Clear 6 mil Plastic Sheeting

The important part is having something to protect yourself and any surfaces that it may touch that you care about.

Are you aware that you could get burned if CA glue fell on your jeans and why paper towels could be a problem with CA glue? Read my article on CA Glue Safety: Natural Materials.


For the curious, here’s what I’ve learned about other plastics and additional research I did after reading the Starbond article.

None of the information here is certified or warrantied in any way. I am a hobbiest and sharing the best information I’ve learned, but I may be 100% wrong on everything and your safety is always your responsibility and you should verify and confirm information for yourself. Where possible I have included links to serve as a starting point for research for you.

Acetal Homopolymer/Copolymer (Delrin and Celcon)

I have been unable to tell if this includes both Delrin and Celcon, the two types of acetal plastics, or just Delrin. I suspect “both” since this article from 3M talks about how both are hard to glue, and this article talks about how they are very similar for most uses. The 3M article also notes how to use CA glues to bond them with the addition of a primer.

I haven’t actually tested this, because it’s not a coating used on gloves, but if you were looking for a surface to work with glue on, an acetal sheet may be a great choice (though if you use odorless you may run into problems.)

Polypropylene

I was unable to find any polypropylene coated gloves other than these, and they aren’t useful because they are a loose cotton weave and the glue would easily get on your fingers between the holes.

PTFE (e.g. Teflon)

The only gloves I was able to find that were PTFE-coated are expensive, bulky ones like these cryogenic gloves.

HDPE (High-Density Polyethylene)

HDPE has polyethylene at its base, but is a high density version, which I presume is why it’s more resistant to CA glue than regular polyethylene.

Plastic wrap is LDPE (low density polyethylene), making it an interesting option for protecting larger surface areas though I haven’t tried it yet.


All my “Before you start” with CA glue articles:

Posted on Leave a comment

CA Glue Safety: Fumes

CA glue can irritate your eyes, nose, mouth and lungs, because the fumes are a vaporized form of the CA itself and they react instantly with the moisture in your body just like they do with moisture on a surface or from a CA accelerant. About 1 in 20 people will also eventually become sensitized to CA fumes after repeated exposure and develop flu-like symptoms hours or days later. And finally, for some people, the fumes will trigger their asthma.

But lots of woodworkers work fairly freely with CA and just rely on their shop ventilation. You will need to evaluate yourself, your room setup, and your personal choices and risks to decide how much protection you want to follow and how much risk you’re comfortable with.

All manufacturers will provide the SDS (Safety Data Sheet — here’s an example from BSI) so you can read through and decide.

You can also read through the SDS for materials you already use to help estimate risk based on how materials you use today are described (e.g., The SDS for a brand of simple 99% alcohol, or the SDS for Renaissance Wax or for a brand of denatured alcohol.)

None of the information here is certified or warrantied in any way. I am a hobbiest and sharing the best information I’ve learned, but I may be 100% wrong on everything and your safety is always your responsibility and you should verify and confirm information for yourself. Where possible I have included links to serve as a starting point for research for you.

Work in a well-ventilated area (at a minimum a fan blowing fumes away from you) and if you’re using a mask, you’ll want a P100 respirator with organic vapor cartridges, not just a little N95 disposable mask.

Here is an example off Amazon, but this is not an endorsement or recommendation from me, it’s just the result of a quick keyword search and taking the first result: GVS SPR473 Elipse OV/AG-P100 Dust and Organic/Acid Gas Vapour Half Mask Respirator

Whatever mask you choose, know that they’re only as good as the fit and the seal. If air is getting in around the edges, that’s unfiltered air.,

A friend who is a woodworker says he often used an aquarium charcoal filter fastened to the back back of a fan sucking air away from his work area, but I don’t have any other information on how useful or effective that is.

Odorless CA and Fumes

Odorless CA smells less, and the companies advertise it as being less irritating than non-odorless CA.

However, if you read the SDS (Safety Data Sheet) for Supergold, it still notes “Exposure to vapors above the established exposure limit may result in respiratory irritation, which may lead to difficulty in breathing and tightness in the chest.” The established exposure limit is 0.2ppm averaged over 8 hours for all CA brands that I’ve been able to find, and they still recommend a NIOSH-approved respirator with a organic vapor cartridge (e.g. something like this.)

What this means in layman’s terms is: odorless CA is highly likely to be easier on your lungs. But it’s possible it may irritate your lungs anyways, so if you are concerned, you may want to follow the safety precautions for normal CA as well.

Personally I’ve chosen to use odorless CA glue (though it’s more challenging with bushings) with a respirator and fan, but I know many people feel they’re fine just with good ventilation and normal CA glue.

CA Accelerator and Fumes

I found it very challenging to find any safety information on CA accelerators online, so had to go to the manufacturers directly and read the data sheets.

(Updating this section now)

Follow the same safety precautions you do with CA glue and be aware that, like non-odorless CA glue, you may develop an allergy with repeated exposure if you aren’t careful.


All my “Before you start” with CA glue articles:

Posted on Leave a comment

CA Glue Basics

Pen makers can use “CA” glue to finish their pen barrels, and works regardless of whether your pen barrels are wood, acrylic, or polymer clay. It even works fine with many standard polymer clay surface treatments.

CA glue is sometimes called Superglue or Crazyglue, but those are both specific brand names. “CA” comes from “Cyanoacrylate” (Wikipedia) — and no, there is no cyanide in it despite the “cyan” in the name. It’s an acrylic resin.

They form their bond when exposed to moisture, which means they bond very well and quickly to human skin, and also means that their bonding time is faster in humid air and slower in dry air. So if you live in a climate that swings between very dry and very wet, you will need to adjust your technique, and if you live in an exceptionally dry or humid area, be aware that you may end up with more or less time to work than what you see in videos.

All my “Before you start” with CA glue articles:

Safety

Take proper cautions around fumes, avoid having your skin glued together, and be careful of exothermic reactions, but remember that CA glues are agreed upon to generally be safe by the UK and US.

The next few posts after this one go into more detail on CA glue safety.

Shelf life

CA glue does not have a long shelf life. Opened it lasts for about a month (though Mercury says their bottles have caps that let them last longer) and unopened only about a year. Most people will want to buy the smallest bottle they can, as you don’t use very much on each pen.

If you do end up buying in bulk, you can put it in the refrigerator to increase the shelf life from 12 to ~15 months, but make sure it warms up throughly before you open it: condensation inside the bottle would start the bond and could ruin the bottle.

Brands of CA

Not all CA is created equally for pens. If you have had issues in the past with cracking or cloudy CA, it may have been how you were applying it but may also have been the brand.

Per the excellent information on Toni’s site, one of the key things to look for is a CA glue with “flex”, to reduce the chance that you will get cracks or spidering during stress. One example is PMMA (poly methyl methacrylate).

I chose to buy Bob Smith Industries CA glue due to the recommendation on Toni’s site: “Other brands such as super-gold by BSI use other ingredients which works even better.” I got the Supergold thin and Supergold+ Medium because I wanted odorless CA (see below.)

I’ve also heard good things about Mercury from some other polymer clay pen makers.

March 2020: I’ve since switched to Mercury, and wrote an article about why: CA glue: BSI Odorless vs Mercury Flex

Odorless CA

Odorless CA costs about twice as much, but (quoting from the Bob Smith Industries page on Supergold) “eliminates the irritating fumes from the evaporating monomer that make repeated use of CA unpleasant at times.” (But: see my article on CA Glue Safety: Fumes before assuming that Odorless CA or accelerator are perfectly safe.)

CA Accelerator

Because you’re just spreading CA on a surface, rather than pressing two pieces together, and then putting on multiple coats, you may find CA Accelerator useful. However, as I learned on Toni’s site, the ingredients in accelerators can cause some of the cracking/clouding problems.

Specifically, the page says, you want to avoid accelerators with acetone in them, and look for ones like Naptha and Heptane. If you aren’t sure, you need to find the manufacturer’s website, they will have the MSDS/SDS (Material Safety Data Sheets) there and you can read what’s in them. For example, here is the relevant part of the BSI accelerator’s SDS:

She recommends the following brands, but I suggest you click through to the page to see if there have been any new ones added, and to see the ones she is recommending against as well.

My preference is ones like the BSI InstaSet, because they aren’t an aerosol, but are a pump action. I explain why in my article on applying CA to the pen body.

Applying CA glue

While I have a longer article on this as well, the short and sweet is:

  • Your surface must be completely dry (so don’t pre-treat with something like modpodge)
  • You should have already sanded your blank to at least 800 grit, as any big scratches will be amplified by the glossy surface (just like what happens when you try to use resin on a scratched piece)
  • Getting CA off your bushings is a pain; if you have regular CA you can use plastic bushings that don’t bond to CA, but if you’re using odorless you will need to use paste wax on the bushings

For more information, see my article on applying CA to the pen body.

Safety: Fumes

If you are new to CA, I’d recommend reading my post on CA Glue Safety: Fumes for more detail on handling CA glue (including odorless) and accelerator safely.

Safety: Protecting Surfaces

If you’re thinking of getting gloves, you may want to read my post on CA Glue Safety: Protecting Surfaces.

Safety: Natural Materials

If you didn’t know you can get a chemical burn from CA glue and your jeans, you may want to read my article on CA Glue Safety: Natural Materials

I am very grateful to Tony Ransfield Street (Etsy) and Ed Street for posting a primer on using CA Glue when making polymer clay pens. While I’ve expanded on it here with what I’ve learned, theirs was the first really good information I was able to find and I appreciate their generosity.


All my “Before you start” with CA glue articles:

None of the information here is certified or warrantied in any way. I am a hobbiest and sharing the best information I’ve learned, but I may be 100% wrong on everything and your safety is always your responsibility and you should verify and confirm information for yourself. Where possible I have included links to serve as a starting point for research for you.

Posted on 1 Comment

Finishing Pens: Drill with Lock-on

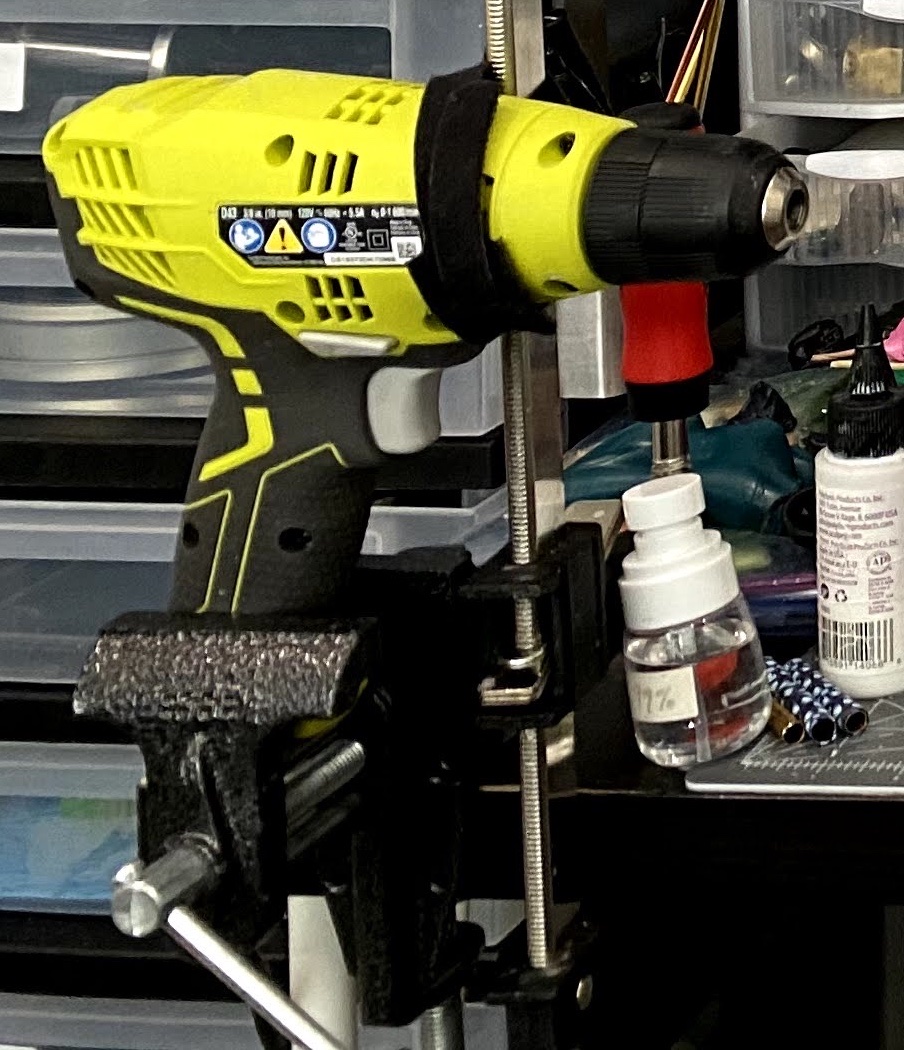
I was very interested in finding a solution that let me use both hands at once, so searched for drills and found this Ryobi (model D43K) with this specific feature: “The variable speed trigger helps you match the speed to the application, while the lock-on feature enables continuous drilling and helps to reduce operator fatigue during long drilling times.”

Advantages:

  • Corded, so won’t run out of battery mid-pen
  • ”lock-on” feature reduces finger fatigue during longer sessions

Disadvantages:

  • Doesn’t stand up on its own

To solve the last hurdle, I rigged together a setup with two vices and some Velcro cable ties and it works surprisingly well. It’s not perfect: there’s a bit of give, and you can’t orient the handle 90 degrees the other way, the vice won’t hold it steady. But I haven’t had any issues yet and I’ve been using it for a few weeks now.

When I’m not doing a pen, I just remove the mandrel and I get almost my whole work space back — if you have a larger table, it would be even less of an issue.

Here’s a photo of the drill in its vices:

Next up I’d like to look into flex shafts, because I suspect that would be the perfect final solution for me: attach a flex shaft, put that in the vice, use the always-on button on the drill and finish my pens easily and safely. When I’ve done that, I will make another post here.

Posted on 1 Comment

Finishing Pens: Cordless Drills

Finishing pens by hand is doable, but it’s harder to get a perfectly symmetrical finish and takes longer. Luckily, since we don’t need a lathe, there are some good and cheaper power tool options available.

Dremels are a popular tool, but unfortunately will not work as well for pens: pens work with a 7mm (1/4”) mandrel (or sometimes larger), and Dremels do not go above a 1/8” shank unless you have a much older one, as the motor isn’t strong enough to drive it effectively.

If you already own a Foredom tool, they can substitute very well for a lathe, and can run hands-free like the Dremel does, but if you don’t they are also expensive for a single tool purchase.

If you aren’t planning on using woodworking tools to literally turn your clay pens, the good news is there is a much cheaper option, though it requires a bit more fiddling: a standard drill.

The first, and simplest solution I used was a cordless drill like the one pictured here. I did have a corded drill, but as it didn’t have a flat bottom, I had to hold it up the whole time which was tiring very quickly when trying to sand.

Advantages:

  • Stands up on its own; my arms didn’t get tired trying to hold a drill in place while I sanded/finished a pen
  • No cord to worry about

Disadvantages:

  • My battery only lasted for 1-3 pens (depending on how much sanding I did)
  • No “hands free” operation: one hand had to be holding it in place and holding the trigger down.

Here are some photos of my cordless drill set up to finish two slimline barrels:

I’m using the polymer clay mandrel from Penn State Industries, but you could use any threaded 7mm or 1/4” rod with some low-profile nuts or extra bushings/spacers to keep regular nuts further away from where you will be sanding.

Next: how I solved the problem of not being able to do my pen finishing hands-free. Read that post here.

Posted on Leave a comment

Finishing Pens: By Hand

Woodturners use lathes to finish their pen blanks, because they need to carve the wood or acrylic down to size. If you have access to a lathe, that’s obviously a fine solution, but unlike pen turners who work in wood, many polymer clay artists do not have access to a lathe.

The good news is, unless you are actually trying to turn a pen using woodworking tools to carve into it after baking or to reduce its size faster than sanding alone would do, you don’t need a lathe.

In later posts I’ll cover how I use drills to finish pens, but you can sand a pen by hand without using any power equipment at all.

Before sanding

If you are finishing by hand, you will want to make sure it’s as smooth as possible. The best way to do this is to roll it gently on the table with a clear acrylic block or tile or other smooth surface.

Alternatively, you can use the heel of your hand, not your palm or fingers. If you use your palm or fingers you will put uneven pressure on it.

Be sure to roll gently and slowly. If you have creases in your clay from where cane slices joined, you can gently roll a knitting needle tip across them to speed up the process. But if you roll on the table too quickly or pressing too hard, you will distort your canes near the edges and may even push the clay off the pen barrel.

Sanding

Start with the highest grit you can. If you were able to get the clay very smooth, that might be 240, 320, or 400. If it’s bumpy, you may need to start lower.

Cup the sandpaper in your hand and sand evenly around the whole pen barrel. Be sure to sand in both directions — back and forth as well as around — to avoid leaving scratches in one direction.

Sand as high as you can, finishing with micromesh or finishing papers if you have them, and then buff.

A note about height and bushings

Pen turners use “bushings” (small metal tubes of a particular diameter) to get their pen bodies flush with the rest of the pen hardware. If you are sanding by hand and care about a smooth transition across the length of the pen, it’s extra important to try to get the height of your pen body as close as possible before baking, so you minimize the amount of sanding you need to do.

Here’s an example of two pens I did. The first is one carefully sanded down to bushing height before being assembled. The second is one of my early ones, before I knew to pay attention to bushing height.

Posted on Leave a comment

Simple Bowl Shape

I prefer making useful objects or artwork to jewelry, which means I make a lot of bowls and boxes. I found a way to make a very simple bowl shape that makes a flat square veneer look much more sophisticated than you would expect.

Lay out the cane tiles to make a square of whatever size you want, and fully flatten and burnish the veneer until you are satisfied.

Carefully drape it over a round form (e.g. a cake pan like these) and slowly smooth it down with your fingers, shaping the clay to the new shape.

I find that spraying some water on the bowl helps as you’re re-shaping the clay.

Bake as normal, and if you want a flat-ish bottom you can remove it from the form as soon as it’s done baking and set it upright on a table. It will flatten slightly on the bottom and make it less tippy when cooled.

Sand and finish as normal.